Hi there! I have a penchant for rainbow blends because I live in a bright, beautiful, and pretty much always sunny city in the North East of Australia (don’t hate me!). Rainbow blends and abstract outlines have pretty much become my signature style. So today I’m going to share my process with you!
I’m also going to share my favorite supplies because I’ve tried a lot (and I mean A LOT!) of different pens and papers and spent loads of my precious cash on things that didn’t work... so I hope you can benefit from my experience as I share my favorite blending tools to make you look like a pro in no time.
I’m Amanda from @theprettinessproject and I’m really honored to be on Peggy’s blog to share with you this blending and outline tutorial. Let’s get to it!
Supplies

- Strathmore Smooth Bristol Paper
- Tombow Dual Brush Pens (The 6 colors I'm using are: 665, 725, 933, 025, 173, 195, and N95 for the base)
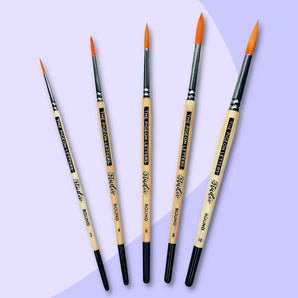
- No 2 round paintbrush
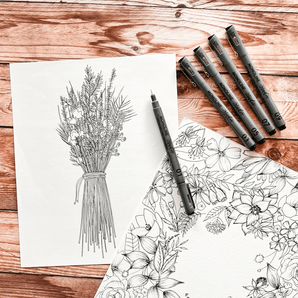
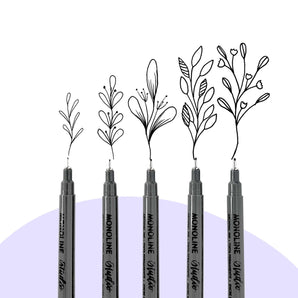
- Micron pens (I'm using sizes 03, 05, and 08)
- Uniball Gel Pen in White
- Pencil
- Ruler
- Rubber
- Water & Paper Towel (not pictured)
- Rhodia Dot Pad for sketching out the design if required (also not pictured)
- PDF print out of this lettering piece!

Organise your supplies with The Pigeon Letters Botanical Canvas Pen Pouch. Because why wouldn't you?!
A quick note about the paper: when it comes to blending brush pens, the paper you use is so very important. When I started, I got very frustrated because my pens wouldn’t blend for me. I was using printer paper and cardstock and I frayed my delicate Tombow tips on the textured papers.
I love my Tombow's for blending! Just remember, their best friend is a smooth coated paper that doesn’t absorb all the beautiful color. It allows them to move, blend, and is thick enough to handle a fair amount of water. My favorite paper for blending Tombow's, which fits all these categories, is Strathmore Smooth Bristol Paper.
Step 1: Decide on your color scheme

This project uses the six colors pictured above to blend with. I’m using analogous colors, which means they are next to each other on the color wheel. I like to do a test strip and blend the colors to see how they’ll look together first. I often get inspiration for color palettes from nature and there’s a great iPhone app called Coolers that will generate color palettes for you!
Step 2: Sketch Out Your Lettering

I must admit that... I don’t lay out my compositions all the time before lettering. But my compositions are always better when I do and I don’t waste my precious paper when I run out of space and have to start over! Rhodia Dot Pads are great for this.
When I do sketch out my letters, I always use a pencil and a rubber. Then, I play around with them until I'm happy with the layout. I then transfer them to my bristol smooth paper using a light pad and a 2H pencil. There is a downloadable PDF of this lettering piece attached here for you to print and copy if you'd like!
Step 3: Lay down your letters with the Tombow N95

Using your pale grey N95 brush pen, go over your pencil lines and lay down your letters. You’re essentially creating a base for you to color and blend over the top of.
Step 4: Section your lettering

Next, blend the 6 colors from top to bottom. Using your ruler, find your horizontal center and divide your lettering into 6 sections to indicate where each color starts and the next one begins.
Step 5: Do your blends

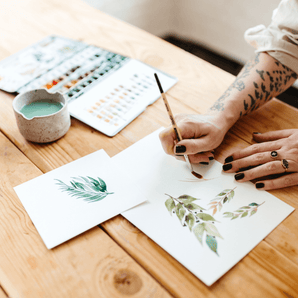
Starting at the top, apply your first color in your penciled section and over the grey base lettering. You don’t need to use a lot of colors. Using less color gives you a more translucent watercolor look.
Then with your no. 2 paintbrushes and a small amount of water, pull the color down and around the grey base lettering within the penciled section for that color. Feather it out lightly at the point where meets the next color.
Use your paper towel to dab your paintbrush on to control your water levels. You only need the paintbrush to be damp. The only way to work out how much water to use is to experiment and practice.
If you feel you need more color you can swatch your pen out on a blending palette and pick up more color and add it. Less is more as you can layer extra if you need it. You can also simply touch your brush to the tip of your brush pen to pick up extra color and layer extra that way.

One by one, section by section, work your way down with the color. With each new color, use your damp brush to move it up and blend it with the color before it. Then blend it down to feather out where the next color begins. You can brush right over the top of the previous section. The Smooth Bristol Paper can handle it and it’ll smooth out the transition.

There will also be a process video of this piece on my Instagram page!

Have you tried lettering in Procreate yet? Give it a go with Peggy's brush lettering bundle.
Step 7: Outlines

Using the 05-micron pen, trace the outline of your letters. It doesn’t matter if you’re not precise, this is a very forgiving style of lettering. If you go inside or outside the lines it doesn’t matter, that’s why I call it abstract! It also covers up anywhere you’ve gone out of the lines with the blending.
With abstract outlines, there’s a through stroke which is usually on the left-hand side which connects the letters together, and a cross stroke which is usually on the right-hand side. Where the lines cross, extend it past the connection point, and then give it a small cross-hatch second stroke at the connection points.
Again, I have detailed video tutorials on my Instagram if you need more direction. When there is a reverse oval, like the b and p, then the sides for the through and cross strokes are in reverse.

Using the 03-micron pen, make scratchy lines just inside the existing line on the right-hand side through strokes only. Then use the 08-micron to trace the “through” strokes to give them more definition.
I like to use the 03-micron to do a light shadow line on the opposite side to the scratchy outline side to give more movement. Again, this is very unstructured and casual so don’t worry about making a mistake because you can't.
Step 8: Shadows, Highlights, and Embellishments

Using your Tombow N95, shadow the right-hand side of your letter over the scratchy lines. Next draw small highlight lines on the left-hand upper side of each letter with the Uniball Gel Pen. Finish with small dots around the edges, wait for it to dry, and rub out your pencil lines.
Then sit back and admire your beautiful work!

Hi, I’m Amanda from @thrprettinessproject and I’m from Brisbane Australia. I’ve been lettering for 3 years now. I started exploring wedding signage ideas on Instagram when I was getting married and fell in love with lettering and the lettering community… and I’ve never looked back. I am a full-time interior designer, wife, and mother to 2 boys. I’m into just about anything crafty and sing everywhere I go.
Cool tutorial, right? Pin it for later.