Hey everyone! I’m so excited to be back with another tutorial on The Pigeon Letters Blog! I’m Aaron Yang, a lettering artist based in Southern California, and in this tutorial I’m going to be teaching you how to make your letters stand out, whether you’re displaying your art somewhere or you’re trying to attract customers and followers on social media. For this tutorial, all you really need is a pen and paper and you’ll be set!
But just in case anyone’s wondering, I’m using:
-
Procreate
-
iPad with the Apple Pencil
-
Block Party Stamp Brush (from my Etsy shop // it’s a great time saver and guide/template if you’re just starting out with this style)
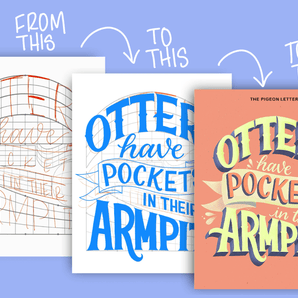
For starters, I’m going to work in a sans serif style for the sake of this example. If your lettering looks something like this:

That's great, but to make your letters truly pop and stand out, I’m going to walk you through a few small details you can add to elevate your letters.
Step 1: Add Flourishes
So right now, I’m starting with really plain and normal letters. They look nice in a simple and minimal way, but the whole point of this tutorial is to “fancy” up our letters a bit. To do this, let’s add some flourishes here and there.
Remember that you can’t add flourishes just anywhere for them to look good, and in my opinion, placement is key. Too many flourishes might make your lettering illegible so be intentional with where and how many flourishes you make. Here’s what I came up with:

Step 2: Add Weight
Awesome! Now you have some elegant flourishes and some beautiful thicks and thins going on! For our next step, I’m going to ask you to take a leap of faith and forget everything you know about the rule of “thicks and thins” and add equal weight to all of your letters. I know, shocking, but trust me. Once you’re done, you should have something that looks like this:

Now you’ve got a much bolder look! This style is called monoweight lettering. If you still prefer your original style, no worries. You can still add weight to your letters but just follow the “thicks and thins” rule so you can still get a bolder look.


Step 3: Add Depth
We’re not stopping there! Next, let’s add some shadows. Shadows can work wonders in any lettering piece, whether you’re working in color or black and white. You typically use colors that are a darker shade than your original lettering color, but don’t let that limit your color palette! It really varies for each art piece.

Step 4: Add a "Skeleton"
Wow, now that you’ve added those shadows, your lettering has already gained a lot of dimension it didn’t have before! Let’s take it another step further and add what I like to call the “skeleton” of the letter. Take a pen with a shade that will be visible within your original lettering and simply draw the basic form of the letters inside. Here’s an example:

Step 5: Add Embellishments
Okay, finally, if you want to add one more touch, illustrate or doodle around your letters. Here’s what I usually do:

This part may be tricky because you want these doodles to highlight your lettering, not take away from them. I choose to skip this step sometimes and just finish the piece off by fixing any small errors that I might have made accidentally.
… And Bam! You’re done! Congratulations! You’ve just upgraded your lettering like a thousand levels! I really want to see your work so please tag me @aaronletters on Instagram or send it to me via email at aaronletters.studio@gmail.com. I had so much fun with this tutorial so I hope you guys had a good time learning too!

Aaron Yang, a self-taught lettering artist is based in Southern California, and has been lettering for about four years. Despite this short period of time, Aaron has gained an audience of over 15,000 people by sharing his art through his platforms on Instagram and most recently TikTok. Besides lettering, Aaron’s passions include walking his dog, Hunter, hanging out with friends, and of course, watching Netflix ;)
Learn more at: msha.ke/aaronletters/