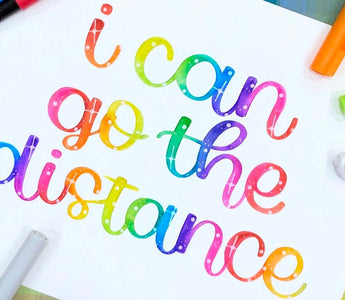
For years, I lettered in my own little bubble before finally venturing into the world of Instagram. Once there, I realized there was so much more to hand lettering than writing the names of my friends and family over and over again in a single color. I became most captivated by the blended lettering pieces that I saw people create, with the colors of the rainbow seamlessly merged together within the letters.
Achieving that effect was hard for me early on. I wondered if the artists showing off their blended masterpieces were creating their gradients digitally instead of with markers and water. Then, slowly, after months of experimenting with different types of paper, brushes, and techniques, I found a way to blend that worked for me, and I’m excited to share it with you.
I’m Emily of @emilettering_. Follow along as I explain my way of creating blending lettering pieces.
Supplies:
- Markers: Any water-based marker will do, but here I used the Sakura Koi coloring brush pens in a variety of colors
- Base marker: Tombow dual brush pen in N95 shade
- Watercolor paper
- Brush: Round size 2 brush
- White pen: Uniball Signo for a more vibrant look, Gelly Roll 10 for a daintier effect
- Water


Grab yourself a perfect combo - Peggy Dean's Ultimate Guide to Brush Lettering and a botanical canvas pen pouch. They are great partners to accompany you on your lettering journey!
Step 1: Write out words in a light base

The first key to blending is to sketch out your word or quote beforehand with a light base color. My go-to pen for this is a Tombow dual brush pen in the N95 shade, a light gray. If you were doing a piece with all warm colors, you might try a very light yellow. Regardless of what color you use, having this base lets you focus on only blending colors later on once it comes time for that step.
I often letter longer quotes or song lyrics, and it can be hard to get the spacing right for those. I recommend typing out your quote in a document and then centering it there. You’ll be able to play around with the layout and also get an idea of how to center the quote once you translate it to pen and paper.
Step 2: Apply color

Once you’ve written out your word in a light base color, you can begin applying actual color to your piece. I loosely fill in my letters with some dashes of color, aiming to have two to three colors in each letter. You don’t need to worry about covering the entire letter in color when you do this step, and you should leave little gaps between the different colors.
I prefer to apply color to only a couple letters at a time before I begin blending. This way, the ink hasn’t dried much by the time I start blending, so it moves more easily, and there’s also less of a risk that I’ll smudge the marker ink while working on earlier letters. If you’re worried about smudging, you can put a napkin or paper towel over some of the later letters so that your hand doesn’t rub off any marker ink.
Step 3: Begin blending with water

This is the fun part as you’ll start using a paintbrush to see the colors on your page magically combine. Dip your paintbrush in water and then dry it off a bit against the side of your water cup. The goal is to have a brush that’s damp but not too wet. If your brush can distribute water in droplet form onto your page, that means you have too much water on the brush. By using a less wet brush, you’ll probably have to dip your brush back in your water cup a lot more often, but you’ll also get more control over your blending.
Once you have your brush prepped, you can touch it to the piece and start blending your letters. I’ll go back and forth over a letter multiple times with the brush to make sure the colors are neatly blended. Make sure you go over the entire letter with your damp brush, not just the areas where the colors connect.
Try to ensure that you’re fully satisfied with your blending on one letter before you move on to the next. If you go back later on to touch up a letter that’s already dry, the water will leave a sort of darker stain in the middle of that letter. For that reason, it’s best to blend each word in a single sitting without taking long pauses because you’ll also get those darker lines if you try to resume a half-blended word that’s already dry. It can be hard to avoid these water lines entirely, but moving promptly from one letter to the next helps minimize the occurrence.
Step 4: Add stars

I usually add little white stars on top of my blended letters once I’m done. The stars add a bit more texture to the piece, and they also help cover up any of those dark water lines I mentioned in the last step. If you decide to add stars, it’s important to wait a bit before doing so in order to let the blended marker work dry. Even if the piece looks dry, it could probably use a bit more time. I wait at least a few hours, and sometimes a day, before applying white pen. Otherwise, the colored marker will absorb some of the pen’s ink, and the white will appear less vibrant.
My main star technique involves drawing a little dot in a slightly bigger width than the tip of the pen. Then I’ll make a line down through the center of the dot, and a shorter line sideways through the center. I try to make sure that the center dot is distinct and a larger width than the lines that will go through it. I usually put a maximum of one of these stars per letter, occasionally skipping letters so the stars aren’t too overwhelming. I also draw some little dots elsewhere on the letters to create the effect of a galaxy with different-sized stars. I’ll make some of the dots the same width as that center dot I mentioned above, and then I’ll make others that are basically just the width of the pen.

Thanks for following along with me. I’m Emily, or @emilettering_ over on Instagram. I’m a writer by day and calligraphy writer by night. When I’m not playing with markers or dreaming of color schemes, I love spending time with my family, watching cheesy TV, and playing tennis or volleyball.
Want to follow along later? PIN this tutorial to try it out whenever you fancy!


