In this tutorial, I'm going to show you how to make beautiful floral letters! You can turn these floral letters into prints for yourself, or even a gift for someone else! I'm using these same steps to create the WHOLE alphabet over on my Instagram right now.
Hi Friends! My name is Maira Vial and I'm from @vialdesigns! I was so excited when Peggy asked me to show you guys my process so that YOU too, can create your own floral letters! Enough chit chat, let's make some floral letters!
Supplies

- Pencil
- Eraser
- Paper
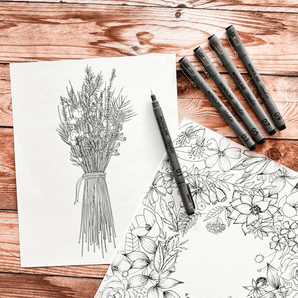
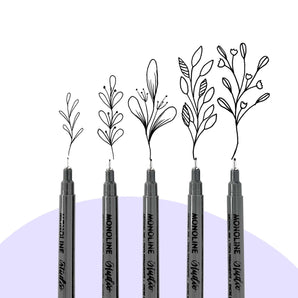
- Monoline Studio Pens 03 & 05
- Tombow Dual Brush Pen - Black n15 (optional)
- Kneaded Eraser (optional)
Step 1: Sketch Your Letter

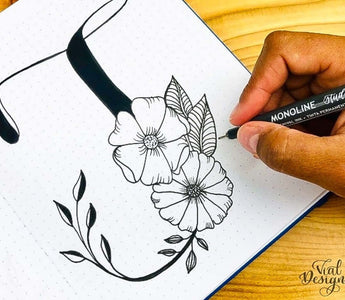
First, start by lightly sketching your letter. I'm drawing the letter "T" in my personal modern calligraphy style. You can do modern calligraphy OR block letters! You can even look at fonts you like and use them as inspiration to draw your letter!
Step 2: Decide on Floral Doodles and Their Placement

It's time to decide what floral doodles you'll be drawing and where you'd like to place them in your letter! I always pick two types of flowers and two types of greenery. It's best to keep it super simple! Adding too many floral doodles can take away from the legibility of your letter.
Practice drawing your floral doodles beforehand. One of my favorite resources for drawing florals is Peggy's Botanical Line drawing book! I've learned so much from this book!

When deciding where to place your floral doodles, make sure you place them in a way that your letter is still eligible. This way, it adds beauty to the letter without taking away from it.
Lastly, make sure your floral drawings are proportional to the size of your letter! Once you have decided on your floral doodles, you're ready to sketch them on the letter you started drawing on step one.
Step 3: Use a Kneaded Eraser (optional)

Use a kneaded eraser to lightly take away your pencil sketch. I like using a kneaded eraser for this step because it doesn't completely erase your original sketch. It leaves enough trace of the sketch for you to go over with your pen! You can use a regular eraser, but sometimes it can end up taking TOO much away from your original sketch. But any eraser will work okay!
Step 4: Trace & Add Personal Touches

I like to trace the floral doodles first, then finish the letter last using your Monoline Studio pen. Be sure to erase any leftover pencil marks using a regular eraser! After all of your pencil is gone, you can use your eraser to go over your floral again. I do this to take away some of the pigment of the pen, but it's your choice!


Add details to the floral drawings using your Monoline Studio pen (03). Using a monoline with a smaller tip will help you have more defined details!
Lastly, fill in the letter using a Tombow Dual Brush pen (n15). You can also use your studio pen (05) for this portion, it may just take a tad longer to finish. Finish off by using your monoline studio pen to going over any areas that may need it!

That's it! You can repeat the same steps to create ANY letter! You can also color the florals instead of just using the black and white outline. I like to leave them black and white, then add the color depending on which way I want to take my final project.
I hope this tutorial was helpful to you and inspires you to start your floral alphabet soon!
Hi there! My name is Maira Vial. I help women be more creative by showing them simple ways to learn calligraphy and hand lettering over at my blog, youtube, AND Facebook! You can also find more of my work at @vialdesigns to check out ALL of the other floral letters I created to get some inspiration of your own!


