Nature serves as endless inspiration, wether you're in it or observing it. I love painting and birdwatching so it felt just right that today I would be walking you through how to paint an adorable little kingfisher bird.
Hi everyone, I’m M. Belen Galizzi, the artist behind @roundaboutbunny. Follow along and I'll show you my process of creating a cute nature painting using watercolours. But first, grab your supplies!


Psst..if you're new to painting with watercolor, be sure to grab yourself a copy of Nature Drawing & Watercolor. And while you're at it, check out this cute lil botanical canvas pen pouch to store your supplies.
Supplies
-
Watercolour paper (sketchbook or paper) 230gsm or more
-
Brushes: a small round one for tiny details, a medium round brush
-
Colours (these are optional, you can work with any kind of colour shades you have)
-
Turquoise blue
-
Intense blue
-
Indigo
-
Cadmium yellow
-
Red (I used a deep shade, Alizarin crimson)
-
Sap green
-
Burnt Umber
-
White gouache or acrylic (optional, just a tiny dot)
-
Water
-
Paper napkins
Step 1: Sketching your painting

Most of the time I use www.pixabay.com for my reference photos as there are lots of free pictures for you to get inspired and paint. I went for a kingfisher but you can paint your favourite bird as well. Keep your sketch simple and loose, just focusing on the proportions of the bird. I did random branches filling out the empty spaces and making guides for where some of the leaves should be.
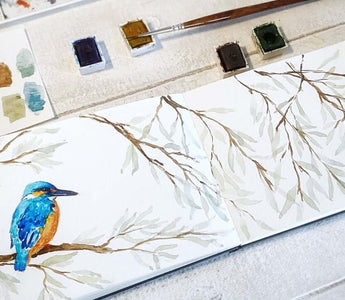
Step 2: Adding the blue feathers

Wet the paper only where the blue areas of the bird. With your medium brush and intense blue, start by doing dry strokes for the long feathers on the wing, letting the colour run upwards. With turquoise blue, drop some tiny dots of paint on the long feathers and paint the back of the bird until you reach the tail. Add a drop of intense blue at the tip of the tail and at the tip of the other wing.
Paint the head in turquoise at the back and intense blue at the front and eye area.
Step 3: Orange feathers and feet

Wet the belly and the head without touching the blue parts. Add some drops of yellow to your wet areas.
With your small brush, while the yellow is still wet, drop some red over the bottom part of the belly and around the eye to create some shadows. Paint the little feet in red as well and let it dry.
Step 4: Eye, beak and branches

Load your small brush with indigo and create the shadows around the eye and paint the beak. Keep it lighter in the middle and more saturated at the top and end of it.
While you wait for the eye to dry, with your medium size brush, use the burnt umber to paint the branches. Add some concentrated painting in some areas and keep it light and with lots of water in others.
Once dry, add a little dot of your white painting for the reflection of the light in the back part of the bird’s eye.

Step 5: Leaves

With your medium brush, mix sap green with intense blue and add water to keep it dull and simple. Start creating leaves where your guides are and leaving space in between them (this is just the first layer). Try changing your green shade by adding more or less blue to your green.
Once dry, add a second layer of leaves to feel the empty spaces. This is also a good time to evaluate if you need to add more branches or not.

And we are done! You can use the same steps to paint different kinds of birds on different scenarios. I really hope you enjoy it and thank you for painting with me!

Hi everyone! I’m M. Belen Galizzi, but you might know me as @roundaboutbunny
Painting and birdwatching are both my favourite activities and is no wonder for me that my favourite subjects to paint are birds. It all started as a hobby but little by little, after sleepless nights, lots of hard work and the unconditional support from my husband and our little son, in spring 2018 I decided to become a full time artist, selling art prints and original works on my Etsy shop. Now I get my inspiration mostly in nature and by trying to find the beauty in the simple things that life presents. Through my art I try to capture and bring that beautiful world I see to the inside of my house.
Enjoyed painting along? Pin for later to come back to this tutorial at any time!


